


The short answer
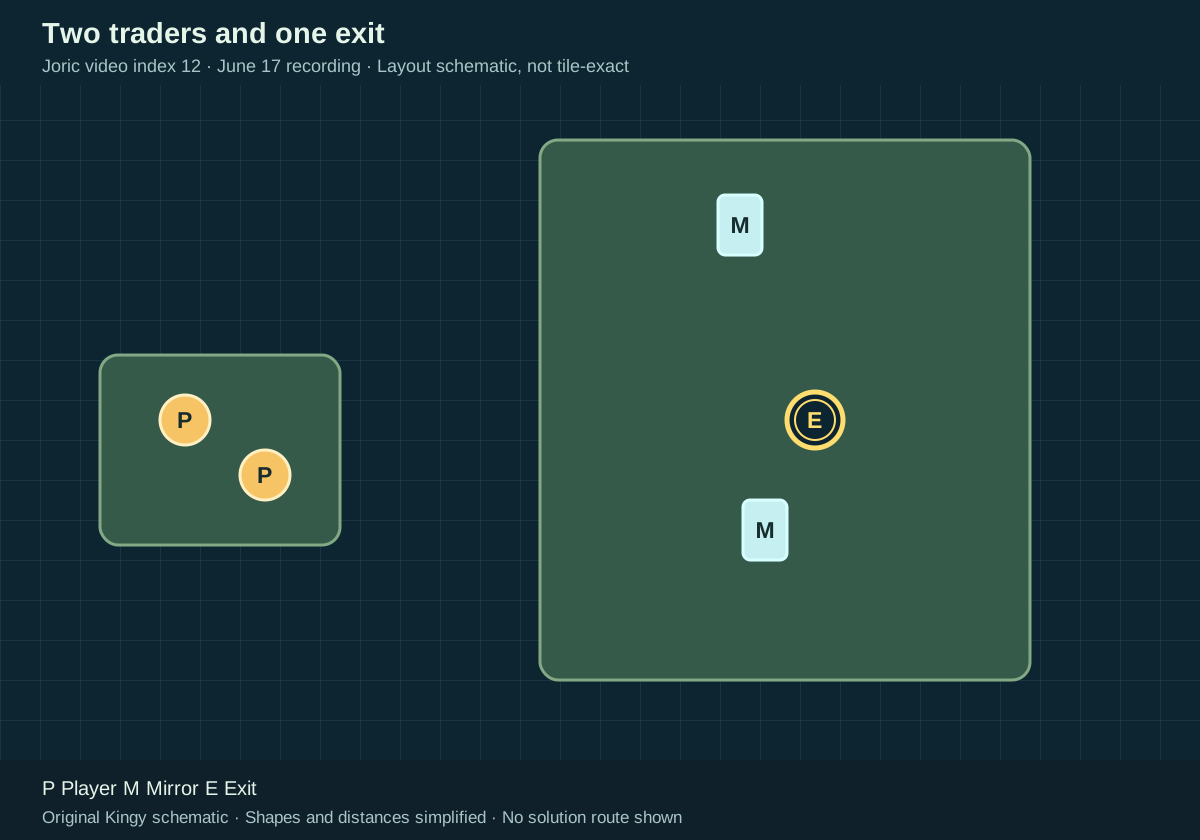
Two traders begin on a small left island. Two oppositely oriented mirrors and one exit circle are on the larger right island. The upper mirror is near the northern edge; the lower mirror is below the exit.
Before you start
- Start from a reset room matching the diagram. The demo recording was published June 17, 2026; its exact build number is not shown.
Match the starting layout
Joric video entry 12 · Community map identifier: mirror_14. The diagram shows the starting landmarks; use the video for exact tile positions and mirror angles.
Sources for this section
- Joric: Mirror Isles: 23 demo puzzle solutions · Checked 2026-09-13 · Published 2026-06-17
- Joric and contributors: Demo map and community-reported level identifiers · Checked 2026-09-13
- Joric: How the demo level identifiers were recorded · Checked 2026-09-13
- Arc Games Europe: Demo Content Update Now Live · Checked 2026-09-13 · Published 2026-06-19
- Thekla / Arc Games: Official developer announcements · Checked 2026-09-13
Hint 1 — a direction to explore Reveal solution / story details
Watch where both traders’ reflected images land. The single exit calls for a different final arrangement from the previous room.
Sources for this section
- Joric: Mirror Isles: 23 demo puzzle solutions · Checked 2026-09-13 · Published 2026-06-17
Hint 2 — the useful arrangement Reveal solution / story details
Place the mirrors in a vertical pair to the left of the exit. The useful target has one trader west of the upper mirror and the other east of the lower mirror, with both reflected images on the square between them.
Sources for this section
- Joric: Mirror Isles: 23 demo puzzle solutions · Checked 2026-09-13 · Published 2026-06-17
Solution and gameplay Reveal solution / story details
Start from the untouched room for these counted moves. The route was derived from native-video checkpoints and manually completed in Joric’s separate community recreation on September 13, 2026. It omits a short detour at 5:31–5:36 that returns to the same position. Native-game and current-build reproduction remain untested.
Directions refer to the screen. Each count is a single movement input. “Reflect” means use the game’s reflection action; this guide does not assume a native keyboard binding. Both traders move together. After step 3, keep the mirrors in place.
Joric’s demo recording, published June 17, 2026. Review this room from 4:58; the observed closing state is at 5:47. Exact build not shown. The video continues into other puzzle solutions.
Gameplay recorded by Joric. Order of the Sinking Star © Thekla / Arc Games.
YouTube connects when you load the player. No autoplay. If playback is unavailable, use the YouTube link.
- Move up once and reflect. Move up twice, then right once, and reflect again. Both traders are now on the right island, on opposite sides of the lower mirror.
- Move up five, left one, up two and right one. Move down three to push the upper mirror south. It now stands northwest of the exit.
- Move right two, down four, left one, down one, left one, up one, right two and up two. This shifts the lower mirror left and north. Check the 5:18 arrangement: the mirrors share a column with one free square between them, immediately left of the exit; both traders stand side by side immediately right of the exit.
- Move up four, down three and right three. The stepped northern coast changes the traders’ spacing. They finish as a vertical pair in the same column at the right edge (5:23).
- Move left three, up three and left three. Both traders form a vertical pair immediately northwest of the upper mirror (5:26).
- Move down four, left two and down one. The upper trader stops at the western projection while the lower trader continues toward the southwest edge. They finish one column and two rows apart (5:29–5:30).
- Move right one, down one, right one, down one and right two. Follow the stepped southern coast. The lower trader reaches the far-right end of the southernmost strip; the upper trader is two rows above and one column left (5:40).
- Move left three. The lower trader stops at the left end of the southernmost strip while the upper trader moves farther west. They are now two columns and two rows apart (5:42).
- Move up two, right one and up one. One trader finishes immediately west of the upper mirror; the other is immediately east of the lower mirror. Both reflected images overlap in the free square between the mirrors (5:45.8).
- Reflect to merge the two traders into one between the mirrors. Move right once onto the exit. The native recording shows the merge at 5:46 and the occupied exit at 5:47; the separate community test also reached this state.
Sources for this section
- Joric: Mirror Isles: 23 demo puzzle solutions · Checked 2026-09-13 · Published 2026-06-17
- Joric and contributors: Mirror Isles 12 in the community recreation · Checked 2026-09-13
Research checked 2026-09-13. This is a source-based guide; Kingy has not independently play-tested these steps in the native game. Evidence and coverage.