



The short answer
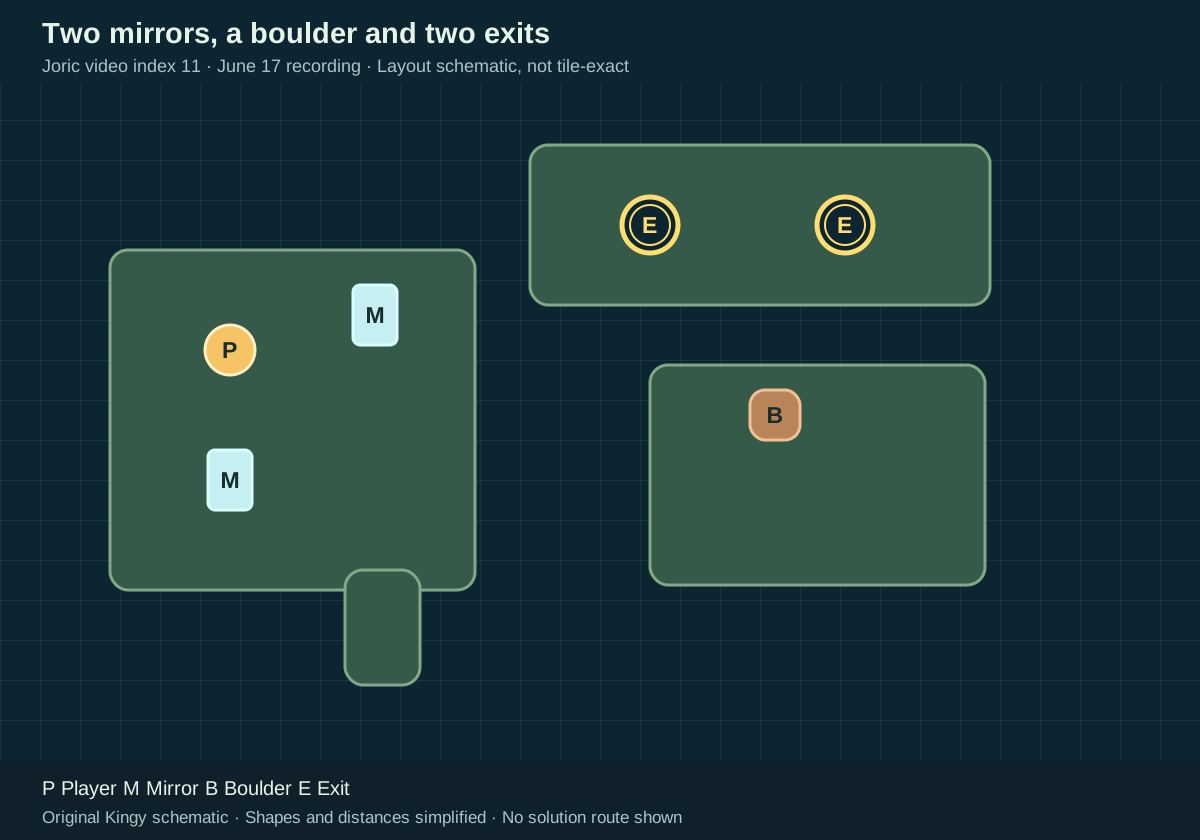
One trader and two mirrors start on the large left island. The mirrors sit diagonally apart, one lower-left and one upper-right. A brown boulder is on the lower-right island, and two exit circles are on the separate top island.
Before you start
- Start from a reset room matching the diagram. The demo recording was published June 17, 2026; its exact build number is not shown.
Match the starting layout
Joric video entry 11 · Community map identifier: mirror_13. The diagram shows the starting landmarks; use the video for exact tile positions and mirror angles.
Sources for this section
- Joric: Mirror Isles: 23 demo puzzle solutions · Checked 2026-09-13 · Published 2026-06-17
- Joric and contributors: Demo map and community-reported level identifiers · Checked 2026-09-13
- Joric: How the demo level identifiers were recorded · Checked 2026-09-13
- Arc Games Europe: Demo Content Update Now Live · Checked 2026-09-13 · Published 2026-06-19
- Thekla / Arc Games: Official developer announcements · Checked 2026-09-13
Hint 1 — a direction to explore Reveal solution / story details
Compare the single trader at the start with the two exit circles. Watch what happens when both mirrors can reflect the same trader.
Sources for this section
- Joric: Mirror Isles: 23 demo puzzle solutions · Checked 2026-09-13 · Published 2026-06-17
Hint 2 — the useful arrangement Reveal solution / story details
First make two traders. Then bring the mirrors into a vertical pair at the left island’s east edge so both traders can reach the boulder island.
Sources for this section
- Joric: Mirror Isles: 23 demo puzzle solutions · Checked 2026-09-13 · Published 2026-06-17
Observed solution and gameplay Reveal solution / story details
The traders move together; island edges and mirrors change their relative positions. Follow the landmark arrangements in the video if their spacing differs. This route does not give a counted input string.
Joric’s demo recording, published June 17, 2026. Review this room from 4:26; the observed closing state is at 4:57.7. Exact build not shown. The video continues into other puzzle solutions.
Gameplay recorded by Joric. Order of the Sinking Star © Thekla / Arc Games.
YouTube connects when you load the player. No autoplay. If playback is unavailable, use the YouTube link.
- Push the lower-left mirror right until it is one tile east and one tile south of the upper mirror. Stand immediately left of the moved mirror, directly below the upper one. When two trader previews appear, activate reflection to create both traders (4:30–4:31).
- Move the pair left so the upper trader pushes the other mirror one tile west. Move down around the right mirror, then push that right mirror one tile north. Both mirrors now share a row (4:34).
- Move down and left. The lower edge holds the lower trader while the upper trader reaches the west side. Walk around the western mirror until a trader is north of it, push it south, then get to its left and push it right. Stop directly below the eastern mirror at the island’s east edge (4:39).
- One trader is below the lower mirror and the other is to its left. Activate the reflection that places the aligned trader on the right island. Move the remaining trader down to the left island’s southernmost extension; its image reaches the right island’s westernmost square. Activate again to bring both beside the boulder (4:43–4:44).
- Move down around the boulder to its south side. Push it north into the water gap below the top island. Cross the submerged boulder and place one trader on each exit circle. Both circles are occupied at 4:57.7.
Sources for this section
- Joric: Mirror Isles: 23 demo puzzle solutions · Checked 2026-09-13 · Published 2026-06-17
Research checked 2026-09-13. This is a source-based guide; Kingy has not independently play-tested these steps in the native game. Evidence and coverage.