








The short answer
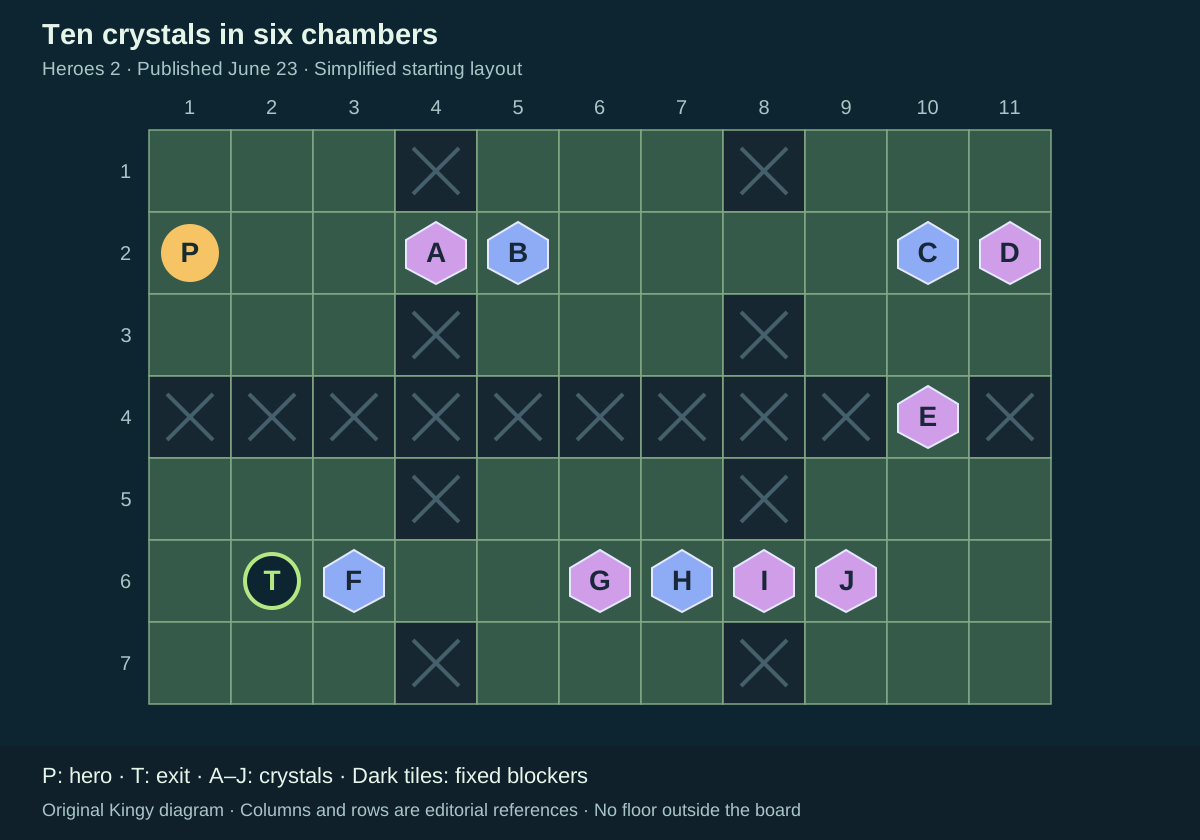
Six chambers in two rows of three. The hero starts upper-left and the green exit is lower-left. Ten crystals occupy the upper horizontal passage, the right vertical connector and the lower horizontal passage.
Before you start
- Start from an untouched or reset room matching the diagram. The source was published June 23, 2026; its native build number is not visible.
Match the starting layout
This is the second Heroes room in Cappa Games’ recording, after the overworld introduction. Its matching community identifier is heroes1_2_v2; that identifier is not displayed in the native footage.
The diagram numbers columns from left to right and rows from top to bottom. These are editorial references for this guide. P marks the single hero and T the exit. Directions describe the board in the recording, not a fixed keyboard or controller binding.
Sources for this section
- Cappa Games | Playthroughs: The first six recorded Heroes of Hauling rooms: native demo gameplay · Checked 2026-09-13 · Published 2026-06-23
- Joric and contributors: Demo map and community-reported level identifiers · Checked 2026-09-13
- Joric: How the demo level identifiers were recorded · Checked 2026-09-13
- Arc Games Europe: Demo Content Update Now Live · Checked 2026-09-13 · Published 2026-06-19
- Thekla / Arc Games: Official developer announcements · Checked 2026-09-13
Hint 1 — where to look Reveal solution / story details
The upper and lower halves connect on the right. First make enough room to reach that connection.
Sources for this section
- Cappa Games | Playthroughs: The first six recorded Heroes of Hauling rooms: native demo gameplay · Checked 2026-09-13 · Published 2026-06-23
Hint 2 — the useful arrangement Reveal solution / story details
You can push a line of crystals together. When that line blocks your next approach, move one crystal above or below it. At the end, the crystal covering the exit can be pushed off from below.
Sources for this section
- Cappa Games | Playthroughs: The first six recorded Heroes of Hauling rooms: native demo gameplay · Checked 2026-09-13 · Published 2026-06-23
Full solution and gameplay Reveal solution / story details
This route contains twelve pushes, counting a whole line moving one tile as one push. The walking directions connect the positions observed in the recording; they are not a captured keyboard log or an optimal-move claim. Crystal colors help identify objects here; this room does not establish a separate ability for each color.
The original footage shows the complete route and the occupied exit. Kingy has not replayed this room in the native demo or completed it in the community recreation. No character switch is shown or needed in the recorded route.
Cappa Games’ native demo recording, published June 23, 2026. This guide covers approximately 2:27–2:42. Exact build not shown. The video continues into other solutions.
Gameplay recorded by Cappa Games | Playthroughs. Order of the Sinking Star © Thekla / Arc Games.
YouTube connects when you load the player. No autoplay. If playback is unavailable, use the YouTube link.
- Walk right two tiles to stand left of A. Push right twice: A and B move together to columns 6 and 7 on row 2, leaving you at column 5.
- Walk down one and right two, then push B up one tile. B rests at column 7, row 1; you now stand at column 7, row 2.
- From the tile B vacated, walk right two, down one and right one. You are directly above crystal E in the vertical connector. Leave C and D untouched.
- Push E down twice, into column 10, row 6. You finish in the lower-right chamber, directly above it.
- Step left, then push J down once to the bottom row. You now stand at column 9, row 6, to the right of the remaining three-crystal line.
- Push left twice. G, H and I move together to columns 4, 5 and 6 on row 6. F stays at column 3, and you finish at column 7.
- Walk down one and left two, then push H up one tile to column 5, row 5. This puts you to the right of G and F.
- Push left twice. F reaches column 1 and G reaches column 2, covering the green exit. You finish at column 3, row 6.
- Walk down one and left one, then push G up one tile. Follow onto the green exit. The hero occupies it from about 2:38; the next white transition begins at about 2:42.
Sources for this section
- Cappa Games | Playthroughs: The first six recorded Heroes of Hauling rooms: native demo gameplay · Checked 2026-09-13 · Published 2026-06-23
Research checked 2026-09-13. This is a source-based guide; Kingy has not independently play-tested these steps in the native game. Evidence and coverage.