






The short answer
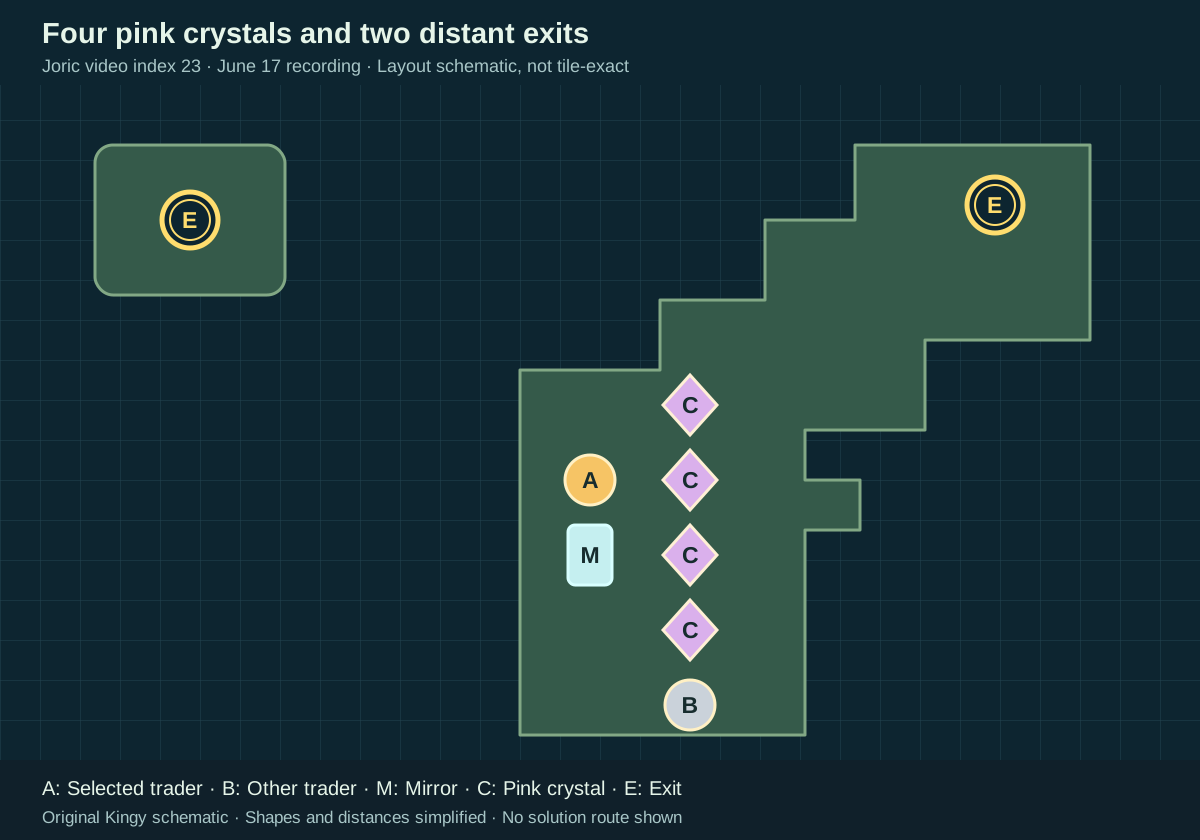
Four pink crystals form a vertical column near the south of a winding mainland. Trader A stands west of the second crystal from the top, trader B below the bottom crystal, and one mirror west of the third crystal. The mainland leads northeast to one exit; a separate northwestern island holds the other.
Before you start
- Start from a reset room matching the diagram. The demo recording was published June 17, 2026; its exact build number is not shown.
Match the starting layout
Joric video entry 23 · Community map identifier: walk_it_over. The diagram shows starting landmarks; use the video for exact tile positions and mirror angles.
Sources for this section
- Joric: Mirror Isles: 23 demo puzzle solutions · Checked 2026-09-13 · Published 2026-06-17
- Joric and contributors: Demo map and community-reported level identifiers · Checked 2026-09-13
- Joric: How the demo level identifiers were recorded · Checked 2026-09-13
- Arc Games Europe: Demo Content Update Now Live · Checked 2026-09-13 · Published 2026-06-19
- Thekla / Arc Games: Official developer announcements · Checked 2026-09-13
Hint 1 — a direction to explore Reveal solution / story details
A sunk crystal can support a trader or another crystal. Work out which landings must exist before anyone leaves the mainland.
Sources for this section
- Joric: Mirror Isles: 23 demo puzzle solutions · Checked 2026-09-13 · Published 2026-06-17
Hint 2 — the useful arrangement Reveal solution / story details
Use two supports below the southern mirror: a near one for pushing it north, and a farther one for transfers. Relay the remaining crystals through a western support before sending either trader toward the distant exit.
Sources for this section
- Joric: Mirror Isles: 23 demo puzzle solutions · Checked 2026-09-13 · Published 2026-06-17
Observed solution and gameplay Reveal solution / story details
Directions refer to the recorded view. Reflect means your configured reflection action; no native keyboard binding is assumed. Switch trader means select the other trader using your configured controls. A and B identify their starting positions; they are not character classes. This landmark route was checked against the native recording and manually completed in the separate community recreation. The tested movement table below belongs to that recreation; Kingy has not replayed it in the native game or verified a current build.
Joric’s June 17, 2026 demo recording. Both exits are occupied at 12:15 and the video fades at 12:16. No explicit completion text or next-room footage is shown. Exact build not shown.
Gameplay recorded by Joric. Order of the Sinking Star © Thekla / Arc Games.
YouTube connects when you load the player. No autoplay. If playback is unavailable, use the YouTube link.
- Switch to trader B, initially below the crystal column. Get west of the bottom crystal and push it east two tiles. Get above it and push it south two tiles into the water just below the mainland. This near support is visible at 10:53. Park B on the small eastern projection beside the remaining crystals (10:54).
- Switch to A. Push the mirror south two tiles and east three to the southeastern edge, immediately north of the near support. Move the bottom remaining crystal west two tiles, then south two to the mirror’s row. Reflect it into water farther south, creating the lower support (11:00).
- Move the next crystal west two tiles and south three to the same left-edge staging tile. Reflect it onto the lower support, where it stays solid. Walk A to the tile immediately west of the mirror and Reflect onto the near support beneath it. Push the mirror north to the mainland’s northern bend, then step right to clear the line. Reflect the standing crystal into open water to the west; it sinks by 11:13.
- Get north of the mirror and push it back to the southern station. Move the last original crystal west two tiles and south four to the staging tile, then Reflect it onto the lower support. Reflect A from immediately west of the mirror onto the near support. Push the mirror north to the bend, step right, and Reflect the last crystal onto the western support. It remains solid there (11:28).
- Move the mirror around the bend: south three tiles, east two, north three and east three. Walk around it between pushes so you can push from the correct side. At this eastern station it shares a row with the western crystal. Stand off the reflection line and Reflect. The last crystal sinks far southeast; all four supports are visible by 11:43.
- Return the mirror west to the northern bend, then south to its southern station. Walk A to the far-left land tile of the mirror’s row. Reflect A onto the lower offshore support (11:50). B remains on land.
- Switch to B. Walk to the tile immediately west of the mirror and Reflect onto the near support directly beneath it. Push the mirror north to the bend while A waits on the lower support. The video shows this helper transfer and the first northward push at 11:54.
- At the northern bend, step B right to clear the reflection line. Reflect A from the lower support onto the western support (11:58).
- Move the mirror around the same bend: south three, east two, north three and east three. Step off the reflection line and Reflect A from the western support onto the far southeastern support (12:08).
- Get below the mirror and push it north to the top row of the northeastern island. Clear its south-facing reflection line and Reflect A onto the northeastern tile of the northwestern island (12:13). Move B onto the nearby exit. Switch to A, walk one tile west and one south onto its exit. Both exits are occupied at 12:15; a white fade ends the recording at 12:16. The separate movement table uses five north pushes and places B directly on its exit before the last reflection.
Sources for this section
- Joric: Mirror Isles: 23 demo puzzle solutions · Checked 2026-09-13 · Published 2026-06-17
- Joric and contributors: Mirror Isles 23 in the community recreation · Checked 2026-09-13
Tested movement table — community recreation Reveal solution / story details
This counted route was manually completed in Joric’s separate PuzzleScript recreation on September 13, 2026. Both exits were visibly occupied. It is not a native input recording or a current-build playtest. Start from the untouched room, with A selected, and check each row’s result before continuing. The stored solution player was not used.
Up, Down, Left and Right mean one directional input unless followed by a count. Reflect and Switch trader name actions; in this recreation they use X and C. Those keys are not verified native bindings. Rows 9 and 14 walk around the bend between mirror pushes.
A is the initially selected trader west of the crystal column; B starts below it. The near support is directly below the southern mirror station; the lower support is farther south in the same column. The northern bend and eastern station are identified in the native route above.
| Stage | Movement | Check before continuing |
|---|---|---|
| 1 | Switch trader, Left, Up, Right 2, Up, Right, Down 2, Up 3, Right | First crystal sunk just below mainland; B parked on eastern projection. |
| 2 | Switch trader, Down 2, Left, Down, Right 3, Up 2, Left 2, Up, Left, Down 2, Reflect | Mirror at southern station; second crystal sunk farther south. |
| 3 | Right 3, Up 2, Left 2, Up, Left, Down 3, Reflect, Down, Right 3, Reflect | Third crystal stands on lower support; A stands on near support. |
| 4 | Up 10, Right, Reflect | Mirror at northern bend; third crystal sunk west of mainland. |
| 5 | Up 2, Left, Down 10 | Mirror back at southern station. |
| 6 | Left, Up 3, Left 2, Up, Left, Down 4, Reflect | Last original crystal stands on lower support. |
| 7 | Down, Right 3, Reflect | A stands on near support beneath mirror. |
| 8 | Up 10, Right, Reflect | Mirror at northern bend; last crystal stands on western support. |
| 9 | Up 2, Left, Down 3, Right, Down 2, Left 2, Up, Right 2, Down, Right, Up 3, Left, Up, Right 3, Down, Reflect | Mirror at eastern station; last crystal sunk far southeast. |
| 10 | Right 2, Up, Left 5, Up, Left, Down 10 | Mirror back at southern station; A immediately north of it. |
| 11 | Left 4, Down, Reflect | A stands on lower offshore support. |
| 12 | Switch trader, Left 2, Down 3, Reflect | B stands on near support; A remains on lower support. |
| 13 | Up 10, Right, Reflect | Mirror at northern bend; A stands on western support. |
| 14 | Up 2, Left, Down 3, Right, Down 2, Left 2, Up, Right 2, Down, Right, Up 3, Left, Up, Right 3, Down, Reflect | Mirror at eastern station; A stands on southeastern support. |
| 15 | Right, Up 5, Right, Reflect | Mirror at top row; B on nearby exit; A at northeast tile of western island. |
| 16 | Switch trader, Left, Down | A on western exit; both exits occupied. |
Sources for this section
- Joric and contributors: Mirror Isles 23 in the community recreation · Checked 2026-09-13
- Joric: Mirror Isles: 23 demo puzzle solutions · Checked 2026-09-13 · Published 2026-06-17
Research checked 2026-09-13. This is a source-based guide; Kingy has not independently play-tested these steps in the native game. Evidence and coverage.