



The short answer
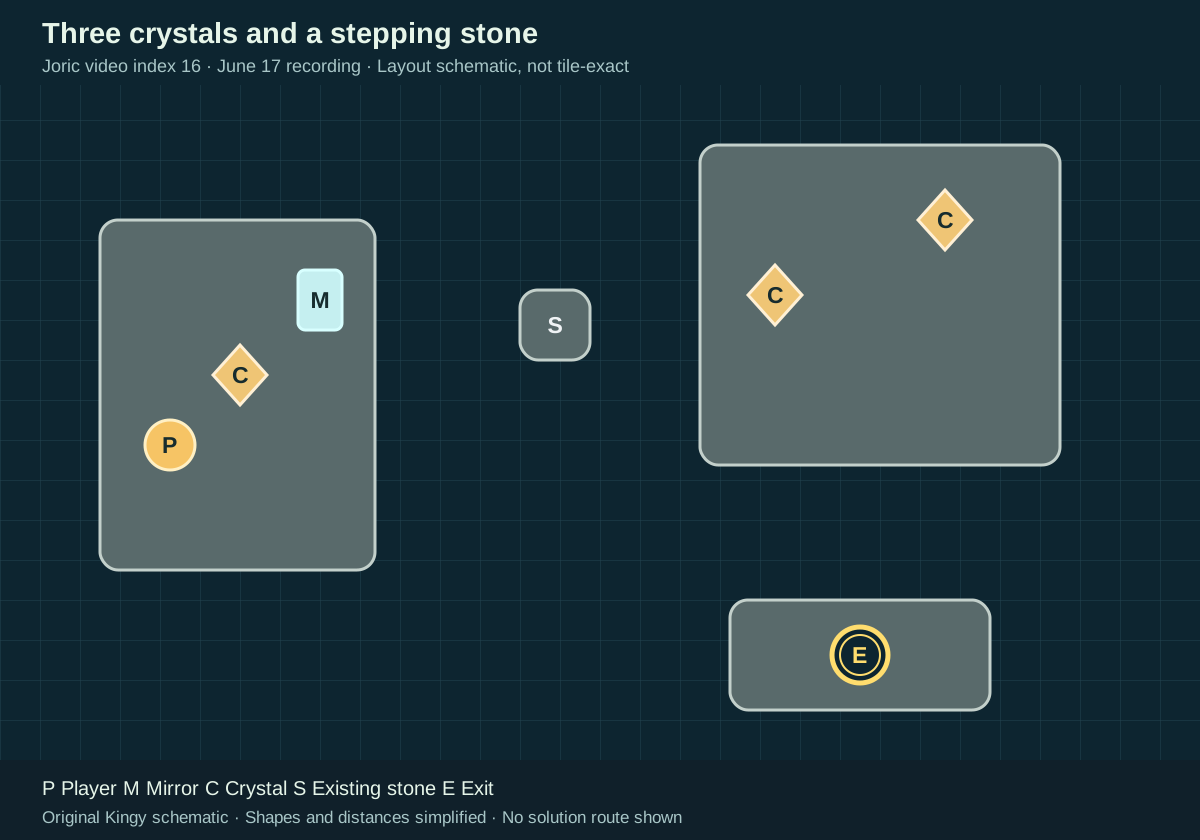
The snowy left island holds the trader, one mirror and a gold crystal. Two more crystals are on the upper-right island. A small stepping stone sits between these islands, and the exit is on a separate island below the right one.
Before you start
- Start from a reset room matching the diagram. The demo recording was published June 17, 2026; its exact build number is not shown.
Match the starting layout
Joric video entry 16 · Community map identifier: mirror_18. The diagram shows the starting landmarks; use the video for exact tile positions and mirror angles.
Sources for this section
- Joric: Mirror Isles: 23 demo puzzle solutions · Checked 2026-09-13 · Published 2026-06-17
- Joric and contributors: Demo map and community-reported level identifiers · Checked 2026-09-13
- Joric: How the demo level identifiers were recorded · Checked 2026-09-13
- Arc Games Europe: Demo Content Update Now Live · Checked 2026-09-13 · Published 2026-06-19
- Thekla / Arc Games: Official developer announcements · Checked 2026-09-13
Hint 1 — a direction to explore Reveal solution / story details
The isolated stepping stone already supplies part of a crossing. Check the water spaces on either side and the room behind the mirror for pushing.
Sources for this section
- Joric: Mirror Isles: 23 demo puzzle solutions · Checked 2026-09-13 · Published 2026-06-17
Hint 2 — the useful arrangement Reveal solution / story details
Use one crystal east of the stepping stone, one west of the mirror, and the last in the remaining gap between mirror and stone. That makes a row you can push the mirror along.
Sources for this section
- Joric: Mirror Isles: 23 demo puzzle solutions · Checked 2026-09-13 · Published 2026-06-17
Observed solution and gameplay Reveal solution / story details
The final crystal is pushed across the partial crossing. It is not reflected back to the start. The mirror stays standing throughout; the crystals supply its path and the space behind it for pushing.
Joric’s demo recording, published June 17, 2026. Review this room from 7:04; the observed closing state is at 7:47. Exact build not shown. The video continues into other puzzle solutions.
Gameplay recorded by Joric. Order of the Sinking Star © Thekla / Arc Games.
YouTube connects when you load the player. No autoplay. If playback is unavailable, use the YouTube link.
- Move the mirror to the upper-right corner of the starting island. Reflect the starting crystal into the water immediately right of the middle stepping stone. Its preview appears at 7:15 and it forms a crossing at 7:20.
- Reflect onto the upper-right island. Bring its lower-left crystal into the mirror line and transfer it back to the starting island. Push it into the water immediately west of the mirror (7:30).
- Return to the upper-right island and push the last crystal down into the crossing row. Push it left across the submerged eastern crystal and the original stepping stone, then into the remaining water gap immediately east of the mirror (7:35–7:38).
- Reflect yourself back to the starting island. The row now runs from a submerged crystal west of the mirror, through the mirror’s standing tile, another submerged crystal, the original stepping stone and the eastern submerged crystal to the right island (7:40).
- Stand on the submerged crystal west of the mirror and push the mirror east along the row onto the right island. Leave the mirror at that island’s west edge and walk far east until your reflection reaches the separate island to the south.
- Activate reflection and walk onto the exit. The arrival is visible at 7:46 and the exit is occupied at 7:47.
Sources for this section
- Joric: Mirror Isles: 23 demo puzzle solutions · Checked 2026-09-13 · Published 2026-06-17
Research checked 2026-09-13. This is a source-based guide; Kingy has not independently play-tested these steps in the native game. Evidence and coverage.