





The short answer
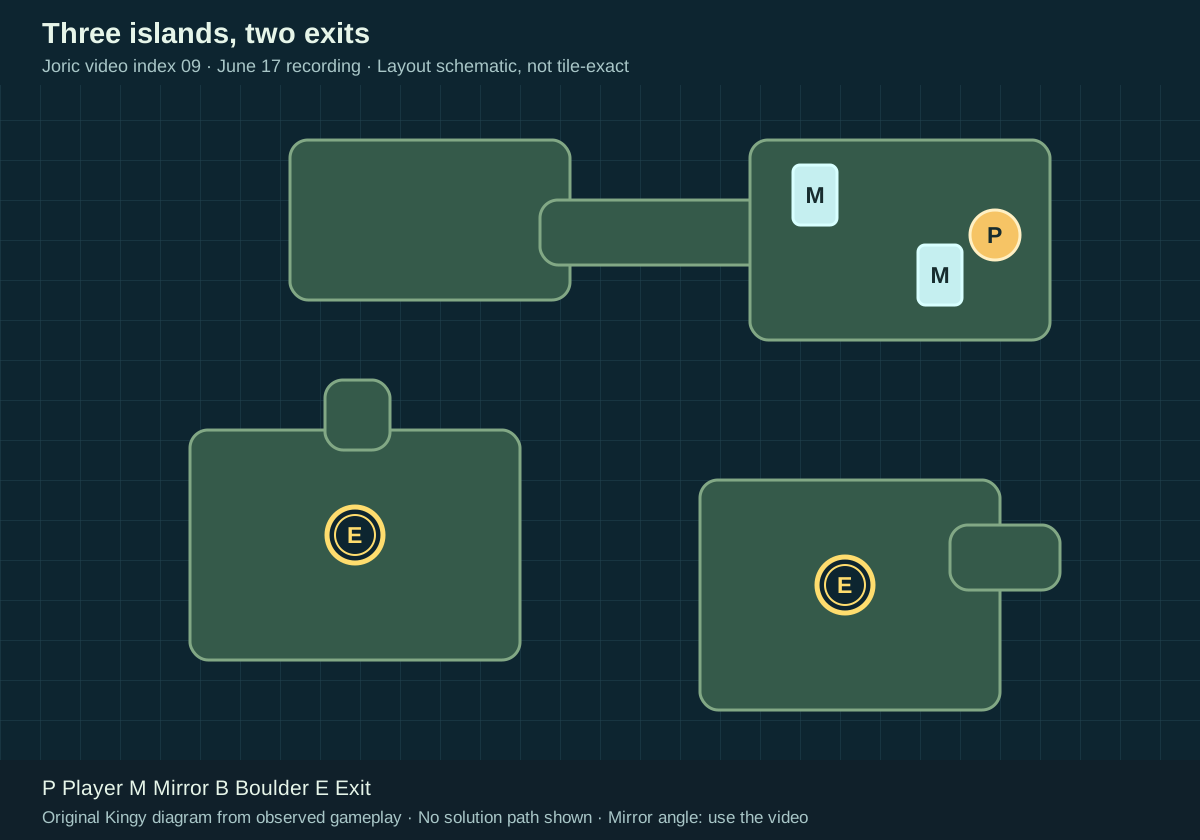
A long northern island has two mirrors on its eastern lobe and one trader near the east tip. Two separate islands lie below it, each with an exit. The southwest island has a narrow northern tip; the southeast island has a small eastern projection.
Before you start
- Start from a reset room matching the diagram. The demo recording was published June 17, 2026; its exact build number is not shown.
Match the starting layout
Joric video entry 9 · Community map identifier: mirror_11. The diagram shows the starting landmarks; use the video for exact tile positions and mirror angles.
Sources for this section
- Joric: Mirror Isles: 23 demo puzzle solutions · Checked 2026-09-13 · Published 2026-06-17
- Joric and contributors: Demo map and community-reported level identifiers · Checked 2026-09-13
- Joric: How the demo level identifiers were recorded · Checked 2026-09-13
- Arc Games Europe: Demo Content Update Now Live · Checked 2026-09-13 · Published 2026-06-19
- Thekla / Arc Games: Official developer announcements · Checked 2026-09-13
Hint 1 — a direction to explore Reveal solution / story details
There are two exits, but you start with one trader. Watch both mirrors’ projected figures when you stand between them.
Sources for this section
- Joric: Mirror Isles: 23 demo puzzle solutions · Checked 2026-09-13 · Published 2026-06-17
Hint 2 — the useful arrangement Reveal solution / story details
Create two traders, then use the different island edges to change their spacing. The northern tip of the western goal island is especially useful.
Sources for this section
- Joric: Mirror Isles: 23 demo puzzle solutions · Checked 2026-09-13 · Published 2026-06-17
Full solution and gameplay Reveal solution / story details
The route was checked against native-demo footage and manually reproduced in Joric’s separate community PuzzleScript player on September 13, 2026. Every exit was occupied in that recreation. Kingy has not replayed it in the native demo or verified the current native build.
The real traders move together; an edge can hold one while another continues. The counted movement table starts from the untouched room. “Reflect” means the configured reflection action, not an assumed physical key. Counts include moves stopped by an edge; follow each input in order.
Joric’s gameplay recording, published June 17, 2026. Start at 3:18; completion is visible during 3:44. Exact native build not shown. The player continues into later solutions.
Gameplay recorded by Joric. Order of the Sinking Star © Thekla / Arc Games.
YouTube connects when you load the player. No autoplay. If playback is unavailable, use the YouTube link.
- Push the lower/right mirror one tile east. Move the upper/left mirror one tile east and two tiles south. They should share a row with one empty tile between them.
- Stand in that empty tile. Both mirrors project a figure directly south of themselves. Activate reflection: the original disappears and two real traders appear, as shown at 3:24–3:25.
- Move up once to push both mirrors north. Move right once: the eastern edge holds the right trader while the left trader moves beside it. Move up once again to push only the right mirror farther north. The traders now stand together on the causeway row, immediately right of the left mirror.
- Continue pushing the travelling mirror left until it reaches the western lobe. Both traders should stand to its right, beside each other. Walk right until the nearer trader projects onto the western goal island, one tile above its exit. Activate reflection; only that trader transfers.
- Move left twice, then up. The lower trader is held by the western island’s water edge, while the upper trader enters the northern row of the remaining right mirror. Move left twice again. Its projection reaches the far-right nub of the eastern goal island. Activate to transfer there, as shown at 3:35.
- Move right until the western trader reaches its island’s east edge; the eastern trader stays on its small nub. Move left once, then up once. The western trader should stand on the island’s single-tile northern tip, while the eastern trader is northeast of its exit.
- Move left once. Water holds the western trader on the tip while the eastern trader moves directly above its exit. Move down until both traders reach their southern edges, then move up once. Both exits are occupied at 3:44.
| Stage | Counted movement |
|---|---|
| Push the lower mirror east | Left ×2 · Down · Right |
| Align the mirrors and stand between them | Up · Left ×3 · Up · Right · Up · Right · Down ×2 · Right · Down |
| Create two traders | Reflect |
| Separate the mirror rows | Up · Right · Up |
| Move the left mirror and transfer one trader | Left ×6 · Right ×3 · Reflect |
| Transfer the other trader | Left ×2 · Up · Left ×2 · Reflect |
| Align both exits | Right ×3 · Left · Up · Left · Down ×3 · Up |
Sources for this section
- Joric: Mirror Isles: 23 demo puzzle solutions · Checked 2026-09-13 · Published 2026-06-17
- Joric and contributors: mirror_11: community puzzle recreation · Checked 2026-09-13
Research checked 2026-09-13. This is a source-based guide; Kingy has not independently play-tested these steps in the native game. Evidence and coverage.