Dressmaker lace trim guide: place, flip and remove lace
Quick answer
On the mannequin, open Accessories and choose your lace trim. Left-click to add pins and right-click to finish. Left-click an end pin to extend a finished run. To remove the whole selected trim, click X in its control panel.
“Dressmaker October Update! Everything You Need to Know ✨” by Emiiary · Oct 14, 2026 · Build 443: uploaded Oct 14 as a walkthrough of the October patch; no build number on screen
Tested by Kingy on the Steam release, build 447 (title screen 447.804bb8a, dated October 19, 2026), Windows 11, keyboard and mouse, new save, October 20, 2026. A later patch can change any of this.
Mac controls checked October 26, 2026, Build 447.804bb8a, keyboard and mouse. End-pin removal differed from the earlier Windows test; use X for whole-run removal.
Place, extend, flip and remove lace trim in Dressmaker.
0:06 · 1. Place and finish
On the mannequin, open Accessories and choose your lace trim. Left click to set the first pin, then add more pins along the edge. Right click when the prompt says Finish.
0:26 · 2. Extend a run
To continue a finished run, left click an end pin. Add the next pins, then right click to finish again. This example turns up the edge.
0:40 · 3. Remove an end pin
Need to shorten a run? On this Mac build, right clicking an end pin removes that pin and shortens the lace. The rest of the run remains.
0:54 · 4. Remove the whole run
For the entire run, select the trim and click the X in its control panel. This removed the remaining lace and restored the inventory to two meters.
1:07 · 5. Reverse the direction
For a one sided trim, try placing it in the opposite direction. Here I remove Ivory Looping Lace and place it again from right to left.
1:19 · Same position. Opposite direction.
Same trim, same position. Left to right puts the larger loops below the band. Right to left puts them above it.
1:29 · 6. Fast Trim Placement
Fast Trim Placement is in the Pause Menu under Gameplay. Tick it, then resume.
1:37 · Move to lay pins
Place the first pin, then move your mouse. Fast Trim Placement lays pins automatically. Right click to finish at the last pin it laid. Check the endpoint; it can stop short of your cursor.
1:55 · Test a short section first
Test a short section first. The full guide and the Mac testing notes are at Kingy dot wiki.
This 2:03 tutorial shows manual placement, extension, end-pin removal, whole-run removal with X, Ivory Looping Lace direction and Fast Trim Placement. Recorded on Mac, Build 447.804bb8a, October 26, 2026. Right-clicking an end pin shortened the run; this differs from the earlier Windows test below.
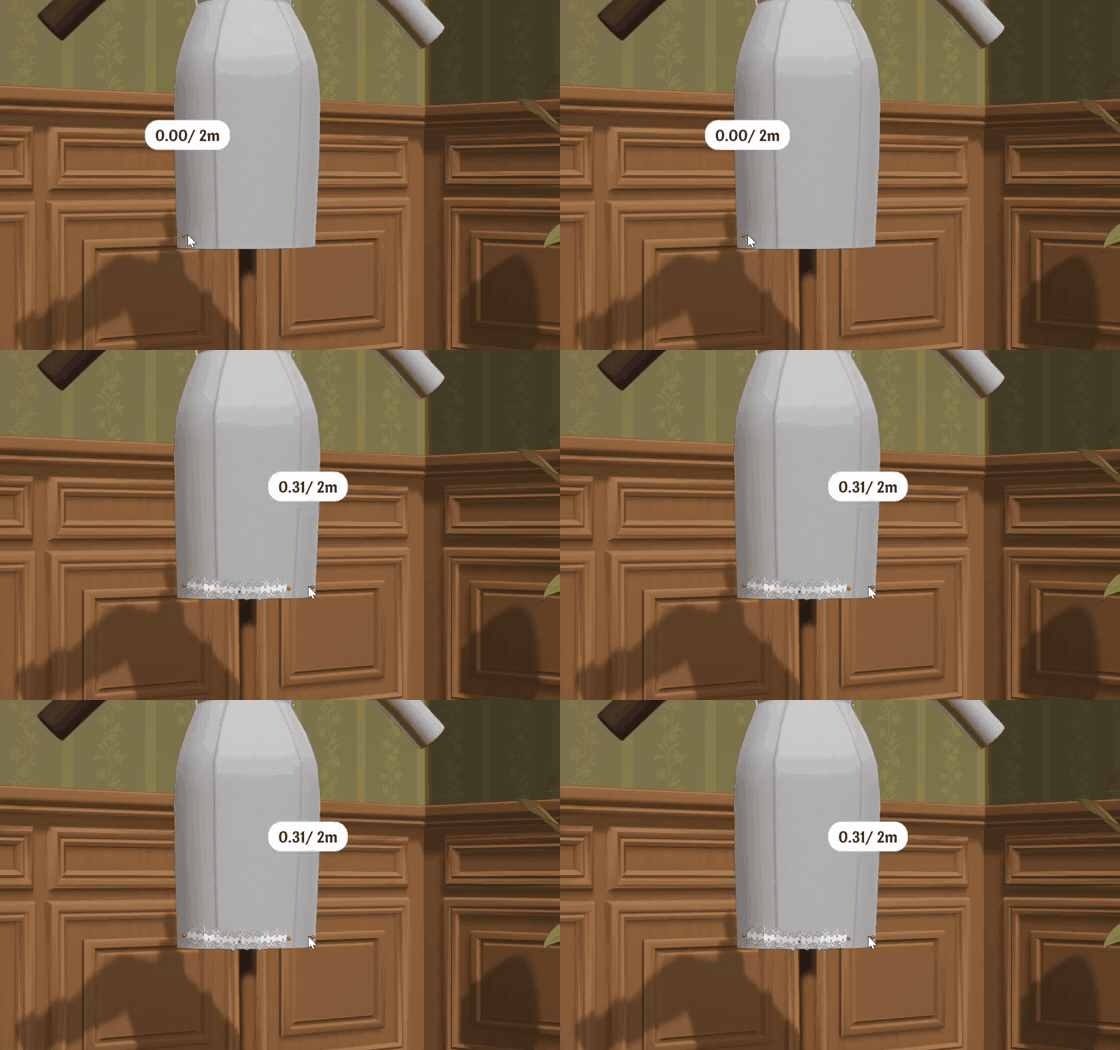
We placed White Zig Zag Lace on Rose’s first dress on build 447. While a run is open, the prompt bar shows Add Point on the left mouse button and Finish on the right, and a counter by the cursor shows the length used against what you own (0.31/ 2m for a hem). The October 9 thread described the same controls on Build 410.
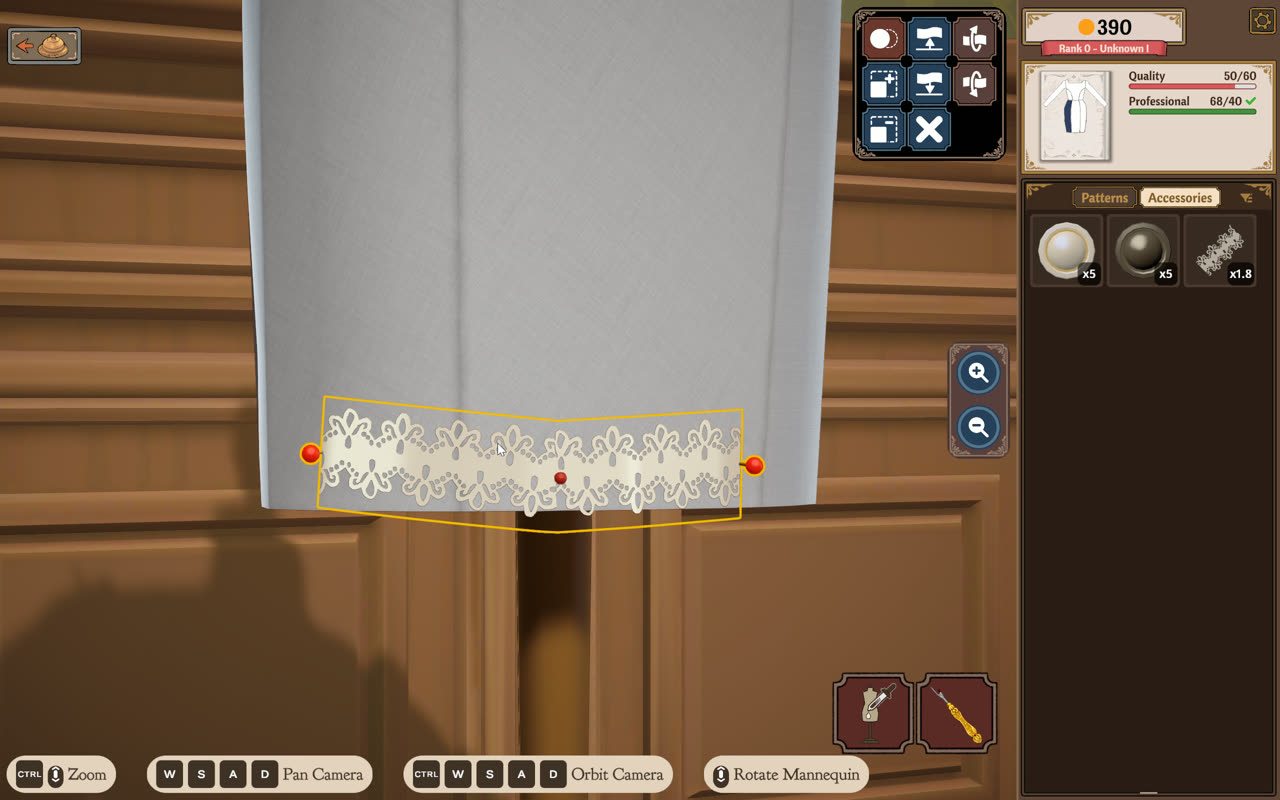
Finishing a run selects it and opens a panel of buttons in the top-right corner (see Adjust the active trim).
With a lace trim chosen from Accessories, click the edge of the cuff to place the first pin, then keep clicking to add pins around it while the length readout grows. Use Finish to end the run; the new trim is then selected and its panel opens in the top-right corner.
“Dressmaker October Update! Everything You Need to Know ✨” by Emiiary · Oct 14, 2026 · Build 443: uploaded Oct 14 as a walkthrough of the October patch; no build number on screen
Jay and SarahSyna describe reversing the placement direction to flip the trim, and PunkHazard says clockwise or anticlockwise placement decides whether it faces up or down. On build 447 it depended on the trim. With Ivory Looping Lace, which has big loops on one side of its band, two straight runs placed left to right had the loops below the band, and a run placed right to left had them above: the direction flipped it. With White Zig Zag Lace, a left-to-right and a right-to-left run came out the same way round.
On Mac, October 26, we repeated the Ivory Looping Lace test in the same position, camera angle and three pin locations. Left to right put the larger loops below the band; right to left put them above it. The tutorial compares identical crops of those results. White Zig Zag Lace was not direction-compared again on Mac. So if a one-sided trim faces the wrong way, remove it and place it again starting from the other end. Check a short section near the hem before tracing a long edge. We tested straight runs only, not curves around a cuff or neckline.
Hover a pin to see Remove Item and Select. The result differed between our two platform tests, despite both title screens showing Build 447.804bb8a.
On Mac, October 26: right-clicking the extended run’s end pin shortened that end and left the rest in place. We also right-clicked the opposite end after deselecting the trim; that removed its end pin and shortened the other end. We did not test deleting a middle pin. Selecting the trim and clicking X in the upper-right panel removed the whole remaining run. The displayed White Zig Zag Lace inventory went from 1.7 m to 1.8 m after the first end-pin removal, then 1.9 m after the opposite end, and back to 2.0 m after X.
On Windows 11, October 20–23: right-clicking a pin removed the whole trim and refunded its length; a middle pin on one extended trim did nothing. Those observations remain the earlier Windows result, not a universal control rule.
The community reports differ too: Bianca O’Flynn describes whole-section removal, while PunkHazard and a 2025 demo player describe single-pin removal. Our Mac test shows that single-end-pin removal is not only an old-demo report. Use the panel’s X for an explicit whole-run removal.
The October 14 patch is mostly about trim and accessory placement. The first two rows were checked in our build 447 play test; the rest come from the official notes.
On screen: On the October patch build, a white lace trim is laid pin by pin along the zigzag scallops of a hem; the trim follows each point and the length readout climbs as red pins are added.
“Dressmaker October Update! Everything You Need to Know ✨” by Emiiary · Oct 14, 2026 · Build 443: uploaded Oct 14 as a walkthrough of the October patch; no build number on screen
Checked on build 447: one click on a finished trim’s end pin reopens the run, with Add Point and Finish back on screen
Fast Trim Placement option
Checked on build 447: under Options → Gameplay. With it on, after the first pin the trim follows your mouse along the dress and lays its own pins, right-click to finish, which keeps the run up to the last pin it laid. The Mac October 26 recording confirmed automatic pins after the first click; the finished run can stop short of the cursor. Check the last placed pin. Our short test does not establish precise tracking around cuffs or every bend. The developer added it partly for accessibility. It ticks from the in-game Pause Menu too: a quick click there didn’t register on October 20, but a slower click did on October 23
Duplicate-trim button
Starts a new piece with the current piece’s height, size and tilt, per the notes. We haven’t confirmed which panel button it is: on October 23 the top-left button (a circle beside a dotted copy) made no visible change to a selected trim, and nothing we pressed on October 20 duplicated one
Drag to rotate the mannequin while placing trim
Turn the dress without leaving placement
Smoother placement, especially around edges; fixes for trim breaking on sleeve cuffs, bows and stays
Cuffs are still the hardest spot: the developer says more work is coming
Default tilt offset removed from some trims, such as the ivory looping lace
Trim on older dresses may sit or fold slightly differently, especially where you adjusted tilt
Trim height can go below zero
Extra range for the height control
Using the last of a trim or accessory removes it from your inventory
When you finish a run, a panel of eight buttons appears in the top-right corner, as SarahSyna described. They have no tooltips. The buttons act while you hold them down: holding the arrow-up button made our lace taller. The curved-arrow buttons made no change we could see from the front. The X button removes the selected trim and returns its length to your inventory. The panel didn’t always come back when we reselected a trim later.
sealskins reports that removal became easier after zooming very close, which fits: the pins are small at normal zoom.
On screen: A lace run is pinned along the waistband with Add Point and Finish prompts. Once a placed trim is selected, a small panel of six buttons and a close X sits in the upper-right corner, the prompts change to Remove Item and Select, and the active lace gets a yellow outline.
Turn on the Accessory Rotation Gizmo in Settings. Seerolz and Prodigy Gamers both recommend it for precise accessory placement, and Seerolz says it gives X, Y and Z rotation. It concerns accessories; neither source says it changes lace controls.
Build 443 adds move buttons to the gizmo for small adjustments, and holding Ctrl turns its frame to match the accessory rather than the mannequin. The same patch stops simple accessories snapping when you nudge or rotate them, adds an option to hide the red outline, and hides other accessories’ pins while one is selected.
On screen: The Pause Menu lists Sewing Assist and Accessory Rotation Gizmo with checkboxes next to the resolution, window and volume settings. Back on the dress, a bow is selected with an orange outline and a small control panel at the top right. Then the prompt bar shows Q E Rotate, Place, Finish Placement and SHIFT Place Multiple.
Check the guide’s version notes before following older footage.
“Dressmaker Tips and Tricks for Beginners 🧵(Cozy Sewing Game)” by Emiiary · Sep 25, 2026 · Uploaded Sep 25, the day after Build 410; no build number on screen
On screen: On the October patch build, a bow on the bodice is selected with the gizmo's button panel open beside the dress, and the bow steps up toward the neckline in small increments.
“Dressmaker October Update! Everything You Need to Know ✨” by Emiiary · Oct 14, 2026 · Build 443: uploaded Oct 14 as a walkthrough of the October patch; no build number on screen
A commission asks for lace and your trim doesn’t count
Lace is also a fabric. Players point out that Fabric lists Lace and Accessories lists Lace and Lace Trim, so check which one the order means.
Pin heads hide the trim and you keep grabbing the wrong piece
Players in the October 9 lock-accessories thread report the same. Build 443 hides other accessories’ pins while one is selected. Our suggestion: place lace before gems and other accessories, and zoom in.
Results look messy
Several players place many short sections, then fine-tune each pin while turning the camera.
Zoom or rotation doesn’t respond
On build 447 hold Ctrl and scroll to zoom, and hold right-click and drag to pan (both checked). Zoomed in, W/S/A/D also pans and Ctrl with W/S/A/D orbits; at normal zoom, holding A or D turns the mannequin, and there are + and − zoom buttons on screen. The older Zoom Bug reports have not been rechecked.
Players in the Zoom Bug discussion report unresponsive zoom or rotation instead. The thread has no confirmed solution. The close-up selection suggestion above assumes zoom is working; it is not a fix for this input issue.
Build 403 fixes some trims that lacked their lace tag. If a lace requirement is not being recognized, compare the installed build with that patch before replacing your design. The note does not say it changes placement controls.
Right-click while placing a run, when the prompt says Finish.
Can I remove just one lace pin?
In our Mac Build 447 test, right-clicking an end pin removed it and shortened the run. Mac middle-pin deletion was not tested. The earlier Windows test removed a whole trim, so check your result.
How do I remove the whole trim?
Select the trim and click X in its upper-right panel. This removed the remaining run and refunded its length in our Mac and earlier Windows tests.
How do I continue a finished trim?
Left-click an end pin, add more pins and right-click to finish again.
Why does my lace face the wrong way?
Try a short run starting from the other end. This flipped Ivory Looping Lace in both platform tests. White Zig Zag Lace did not flip in the earlier Windows test; it was not direction-compared again on Mac.
Where is Fast Trim Placement?
Open the Pause Menu or Options, choose Gameplay and tick Fast Trim Placement. After the first pin, moving the mouse lays pins automatically. Right-click finishes at the last laid pin, which can fall short of the cursor.
Why does lace not satisfy a commission?
Lace fabric, lace accessories and lace trim are separate categories. Check what the commission asks for. The Mac placement test did not test lace-specific scoring.
Kingy tested the installed Mac game on October 26, 2026, with native keyboard and mouse input events. Title screen: 447.804bb8a, October 19, 2026. The recorded tests covered White Zig Zag Lace placement, extension, both end-pin removals, whole-run X removal and refund, controlled straight-run direction with Ivory Looping Lace, and Fast Trim Placement. The dress remained a test commission in progress; no Mac delivery, payment, middle-pin deletion, duplicate, tilt, cuff precision or lace-requirement scoring was verified. The video uses real window captures, selected slow motion and a labelled result freeze frame, with English instructional captions and no audio.
Sources · 14Walkthrough · Reported · Official · checked 26 Oct 2026 · Research checked 26 Oct 2026
Kingy Mac lace-trim tutorial and control tests — October 26, 2026 ↗Kingy tested the installed Mac game on October 26, 2026, with native keyboard and mouse input events. Title screen: 447.804bb8a, October 19, 2026. The recorded tests covered White Zig Zag Lace placement, extension, both end-pin removals, whole-run X removal and refund, controlled straight-run direction with Ivory Looping Lace, and Fast Trim Placement. The dress remained a test commission in progress; no Mac delivery, payment, middle-pin deletion, duplicate, tilt, cuff precision or lace-requirement scoring was verified. The video uses real window captures, selected slow motion and a labelled result freeze frame, with English instructional captions and no audio.Walkthrough ·
Kingy play test: Dressmaker Build 447, Rose’s first commission ↗First-hand play on Windows 11 with keyboard and mouse, October 22, 2026, about 75 minutes. The title screen reads 447.804bb8a, dated 2026/10/19 (Steam build 26043449); Steam’s newest posted patch notes are still Build 443. Covers the title Options, two new games started with and without the tutorial, Rose’s Librarian Workwear brief, measuring, the draft book, mannequin fitting, the International Emporium and the cutting room, plus the cutting toolbar, Discard fabric, the thread spools and the dress-form colour picker on an existing save. Sewing, trim, accessories, delivery and payment were not completed. The silent clips show only the game screen.Reported ·
Kingy play test: Dressmaker Build 447, sewing pins, lace direction and Rose’s delivery ↗First-hand play on Windows 11 with keyboard and mouse, October 23, 2026, about an hour on an existing test save. The title screen still reads 447.804bb8a, dated 2026/10/19. Covers the Emporium store tutorial and buying Ivory Looping Lace (2 m for 4), opening the mannequin from the shop's dress form, clicking a sewing pin and sewing that panel, the thread spools, three straight Ivory Looping Lace runs placed left to right, right to left and left to right, Fast Trim Placement ticked from the in-game Pause Menu, and the trim panel's size buttons. Curved runs and other trims were not tested. Later the same day, on the same save: re-sewing every pin with Sewing Assist on, a back-panel shoulder pin that held back Finish Dress, the photo stage, Complete Commission for Rose’s Librarian Workwear at Quality 58 against her 60 (a warning, her disappointed response and the full 200 paid, 386 to 586 coins), and the thread spool colour after Save and Quit (blue came back as red). Other customers and quality levels were not delivered. The silent clips show only the game screen.Reported ·
Dressmaker Tips and Tricks for Beginners ↗Creator description, chapter times and readable transcript checked, plus six visible comments. Sewing Assist at 6:08; recycling at 8:24; burlap planning at 13:07. Not a full footage audit; capture build unspecified. A viewer cautions that recycling after trimming excess does not restore all material.Walkthrough ·
October Patch Notes — Build 443 ↗Trim placement and selection rework, Fast Trim Placement and Less Animation options, mannequin camera changes, colour and fabric requirement weighting for small components, Discard Fabric and grab-all cutting-room buttons, Sell as off-rack label, later gifting unlock, crash and stutter work (OMEN Gaming Hub note) and new fabrics and trims. Patch notes establish announced behavior, not successful Kingy retests.Official ·
Our First Patch Is Live! — Build 403 ↗Bell progression, cursor and shop fixes, lace tags, accepted-commission payment and single keyhole bodice fix. Patch notes establish announced fixes, not successful Kingy retests.Official ·
Thing’s I’ve Learned ↗Player observations about scoring, saved measurements, filters, cutting, recycling, sewing assist, accessory controls, photo mode, gifts and pigeon invitations. Updated September 25; payment and sale-value formulas remain community claims rather than official mechanics.Walkthrough ·
Dressmaker Game Beginner’s Guide: 20+ Essential Tips and Tricks ↗Off-rack designs open after three custom orders on the next sketchbook page; leftover scraps into quick off-rack dresses; enable the Accessory Rotation Gizmo for precise placement. No build stated; single-source sale-speed claims not adopted.Walkthrough ·
Zoom Bug ↗Reports that zoom input rotates the dress or does not respond. No confirmed workaround or developer fix in the inspected thread.Reported ·
I can not figure out the lace. ↗October 9, 2026 thread after Build 410: left-click pins to place and continue, right-click to finish or remove, clockwise or anticlockwise placement sets the facing, Lace listed under both Fabric and Accessories, short sections recommended. No developer confirmation or Kingy reproduction.Reported ·
Please let us lock accessories in place ↗October 9, 2026 requests: overlapping accessories disturb earlier placement and pin heads hide trim. A feature request, not a fix.Reported ·
Dressmaker demo comment ↗October 4, 2025 demo-build comment: select the lace pin and right-click to undo it. Older build than the Steam release; corroborates the October 9 reports only.Reported ·
Placing Lace ↗Players describe reversing drag direction, active-trim angle controls and close-up selection. No developer confirmation or Kingy reproduction.Reported ·
Kingy play test: Dressmaker build 447, Rose’s first commission from cutting to lace ↗First-hand play of the Steam release on Windows 11 with keyboard and mouse, in a new save, on October 20, 2026. Title screen 447.804bb8a (2026/10/19), Steam build 26043449; an October 17 session on build 446 covered the same cutting-room steps. Covers Rose’s Librarian Workwear: sketch and Draft Pattern, mannequin gears, cutting all 14 panels on two fabrics, pinning and sewing every seam with and without Sewing Assist, thread spools, and White Zig Zag Lace placement, extension, removal, direction and camera controls. A short follow-up on October 22 in the same save checked Fast Trim Placement (switched on from the title-screen Options) and the trim panel’s X button. Not reached: delivering the dress (quality 50 of the 60 required); the duplicate-trim button was not confirmed. Screenshots and silent clips captured from the game window only.Reported ·
Stuck? Tell us where
Say where you’re stuck in Dressmaker. You get one hint at a time from a published kingy.wiki guide, and the answer and its clip stay covered until you ask.
If nothing matches, we keep your words (without emails, links or long numbers) to decide which answers to write next. Privacy

 7:03–7:26Placing a lace trim pin by pin around a sleeve cuff
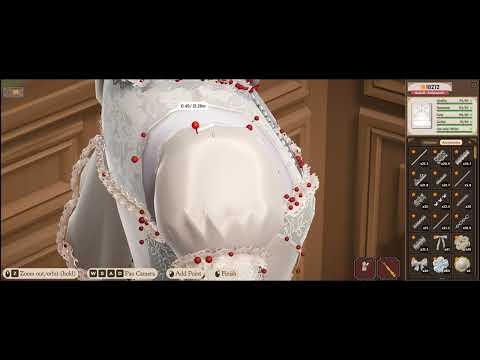 5:44–6:06A selected trim and its upper-right control panel
 12:45–13:06Turn on Accessory Rotation Gizmo, then place a bow